I’ve been thinking a good deal about what I used to need to do as a raid leader, and in what way I was good at it. I figure I can parse a video of a successful first kill, and use that to analyze raid leading. Part (I) will be to explain my UI to non-gamers. Part (II) will be to go through moments in the video, explaining what I am looking at, and what I am thinking, at any given time.
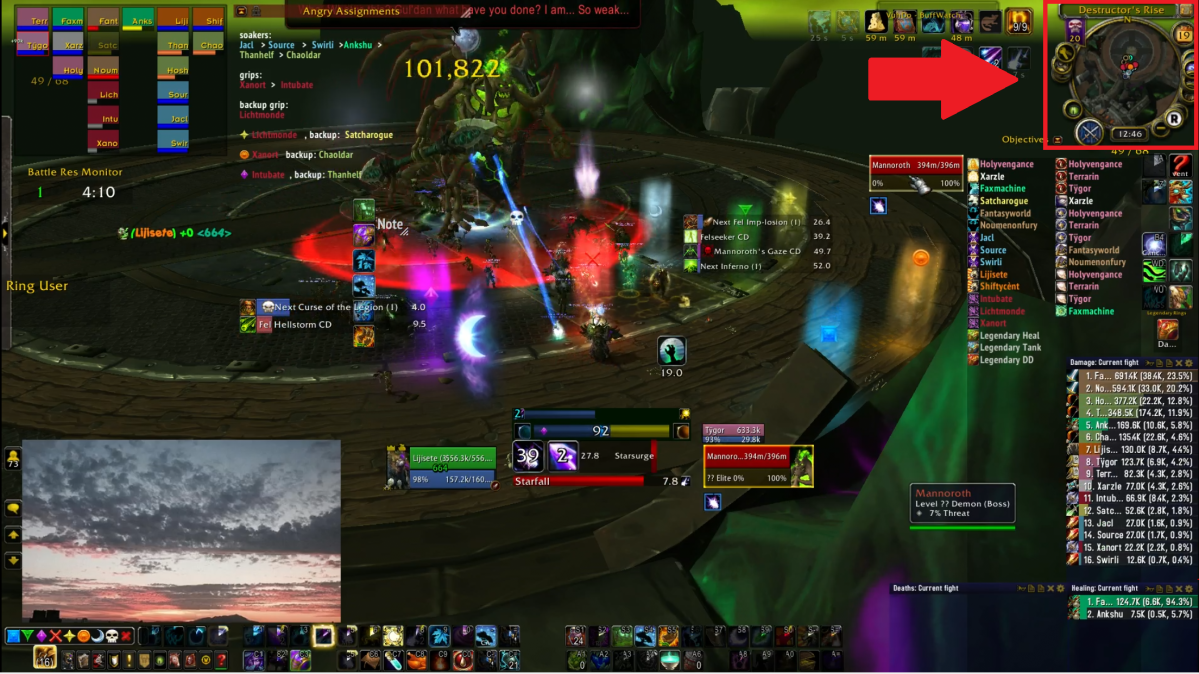
In this post, I’ll first explain my user interface. Here are a couple examples of what things look like at any given moment on my screen.

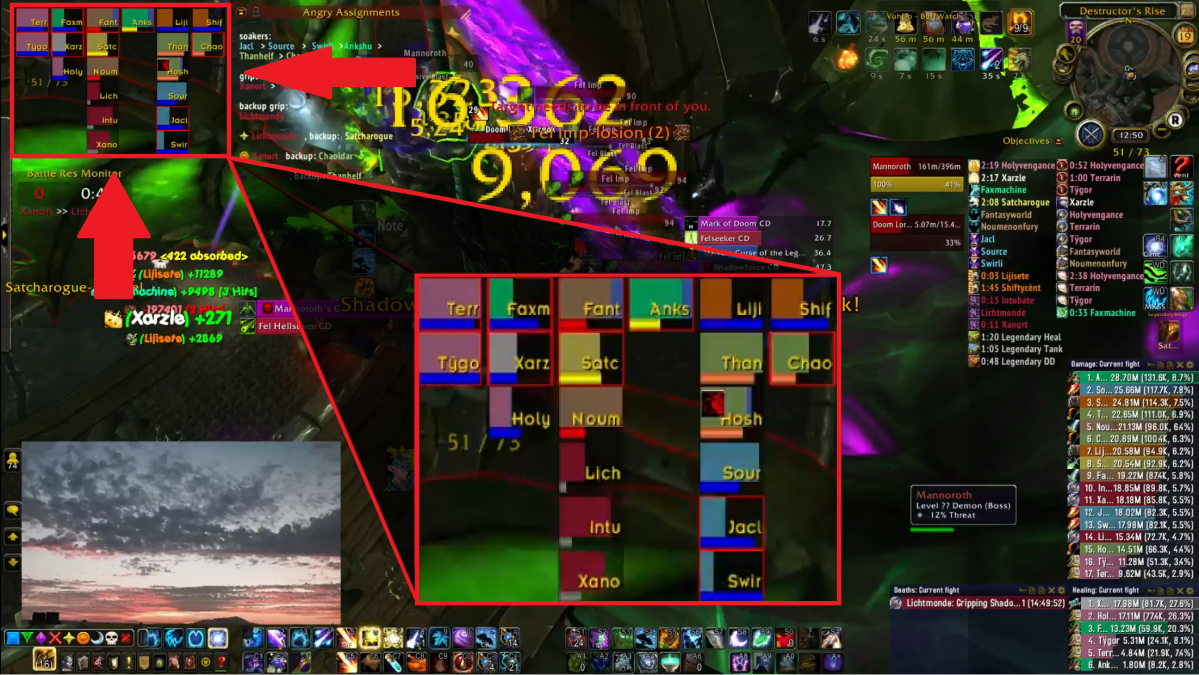
On the top left corner, I have my raid frames.
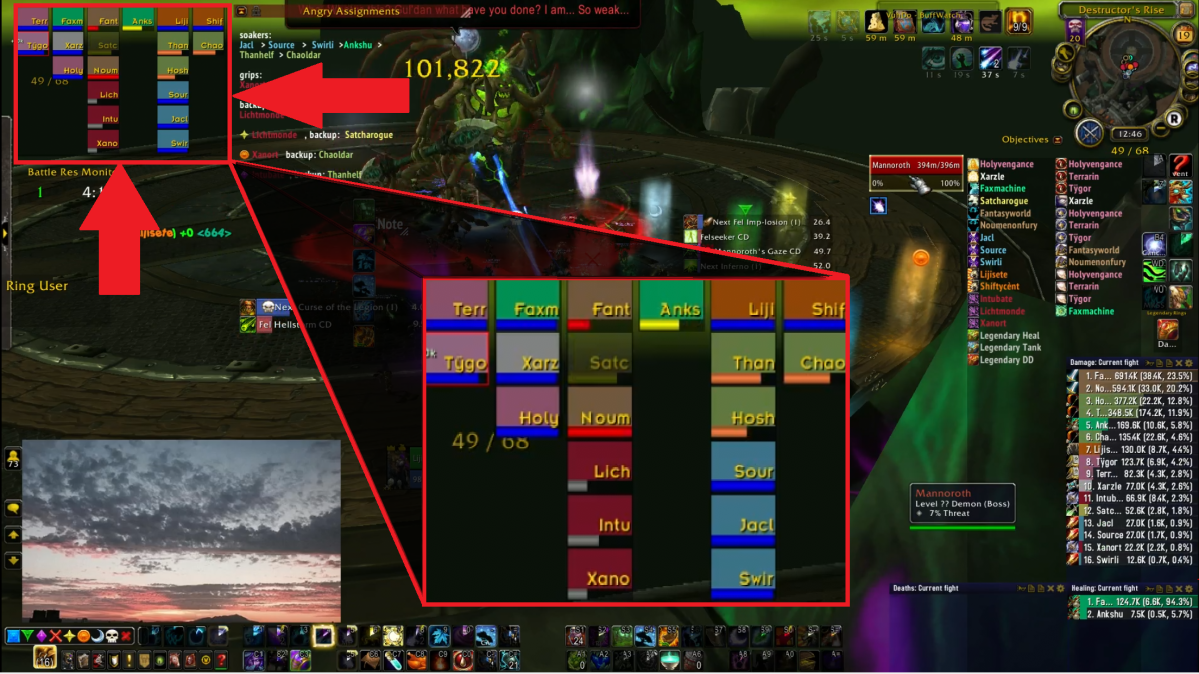
Each rectangle in the raid frame represents a player in the raid. The words show the first four letters of each character’s name. The colors represent what class each person is playing (in WoW, there are 12 classes, and each class is assigned a color. Druid is orange, mage is blue, paladin is pink, etc.). Each box represents the health of that character, so here everyone is at full health. Underneath each box there is a thick line, that represents the resource that class uses (some classes use mana – that’s dark blue; some use energy – that’s yellow; some use rage – that’s red; etc.). A full line is 100% resource, an empty line is 0%. If you look at the second box from the right on the top row, you’ll find me (Liji: orange box – druid, 100% mana). Noci, my banker/officer for the entire time I was guild master is four boxes below me, on another of his characters (Jacl: light blue box – mage, 100% mana). Keith/Death is here too, on one of his healers, last in the second column from the left (Holy: pink box – paladin, 100% mana). Xanort is someone I’ll mention more as time goes on too, he’s on the very bottom, the one on the left (Xano: red box – death knight, about 30% runic power). Notice that Satch (third from left, second from top) is a bit darker than the rest of the group, that simply means he’s out of my ‘range’, which means he’s so far from me that none of my abilities can reach him.
I have my raid frames arranged in such a way that the first column from the left will only include tanks. Most raids use 2 tanks, and you can see that we have here as well: Terr and Tygo, both paladins (pink). The second column from the left includes only healers. Over here, we are using 3 healers (we were underhealing for this fight, many other groups used 4, or 5 healers. But my group was strong so we could do this): Faxm (spring green – monk), Xarz (white – priest), Holy (pink – paladin). The next two columns are melee dps (the damage dealers that need to be close to the boss to be able to hit it), I never allow my columns to exceed 6 players, so if there are more, it becomes multiple columns. Here we have 7 melee: Fant, Satc, Noum, Lich, Intu, Xano, Anks. The last two columns are ranged dps (the damage dealers that do not need to be close to the boss to hit it, but often need to stand still to be able to cast their spells). Here we have 8 ranged: Liji, Than, Hosh, Sour, Jacl, Swir, Shif, Chao.
On the right of raid frames, I have notes for the fight.
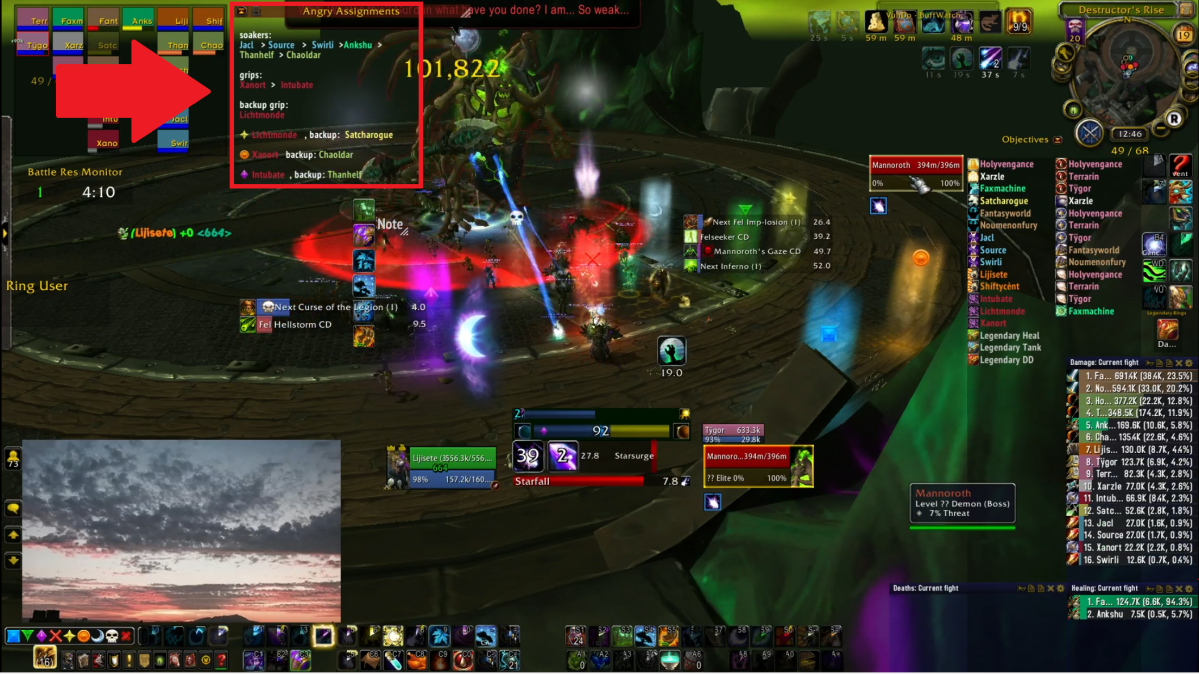
The second and third point of the note show the ‘grip’ order: Xanort first, then Intubate. Then Litchtmonde is the backup grip (for if Xanort or Intubate die). This ‘grip’ ability is something only death knights have (these three people with the color red), when there are a bunch of enemies spread around, they can ‘grip’ them all to one point: this makes it much easier to kill them. This happens many times in the video, the first four times being at 2:05, 2:55, 4:10, 5:10. For this mechanic, if they are not killed quickly, they will kill the raid group, so gripping them together quickly is important. This order is to ensure that people are aware of who’s turn it is, and if I see that Xanort or Intubate have died, as a raid leader I also want to make sure that Lichtmonde knows which times he needs to back them up.
The fourth point is the last three lines. In the fourth phase of the fight, there will be times when three people become ‘horrified’ for a few seconds, and when that’s over, they take so much damage it kills them. However, if someone stands near them when this happens, they will ‘share’ the damage taken, which means both people will be hit for more than half their health, but neither will die. They should have either a yellow star, an orange circle, or a purple diamond over their head when this happens. This last point assigns specific people to help share the damage of each ‘horrified’ person. So, for instance, yellow is assigned to Lichtmonde to help share the damage, and if Lichtmonde himself is chosen, then Satcharogue will share the damage instead, as the backup. Since it chooses 3 people out of 18 (it doesn’t choose the two tanks), it’s rare that both people of the same assignment get chosen, and if that happens we just count ourselves unlucky. We got unlucky in this kill, at 6:05, Jacl, Lichtmonde, and Satcharogue are chosen, which means no one helped save the yellow star person, and Jacl ends up dying. In this video, the markers didn’t actually go over anyone’s head, so really it could have been any one out of the three who died.
Next over is the boss itself. As well as ‘unit frames‘ that, like the raid frame, show the health and resources of the boss.

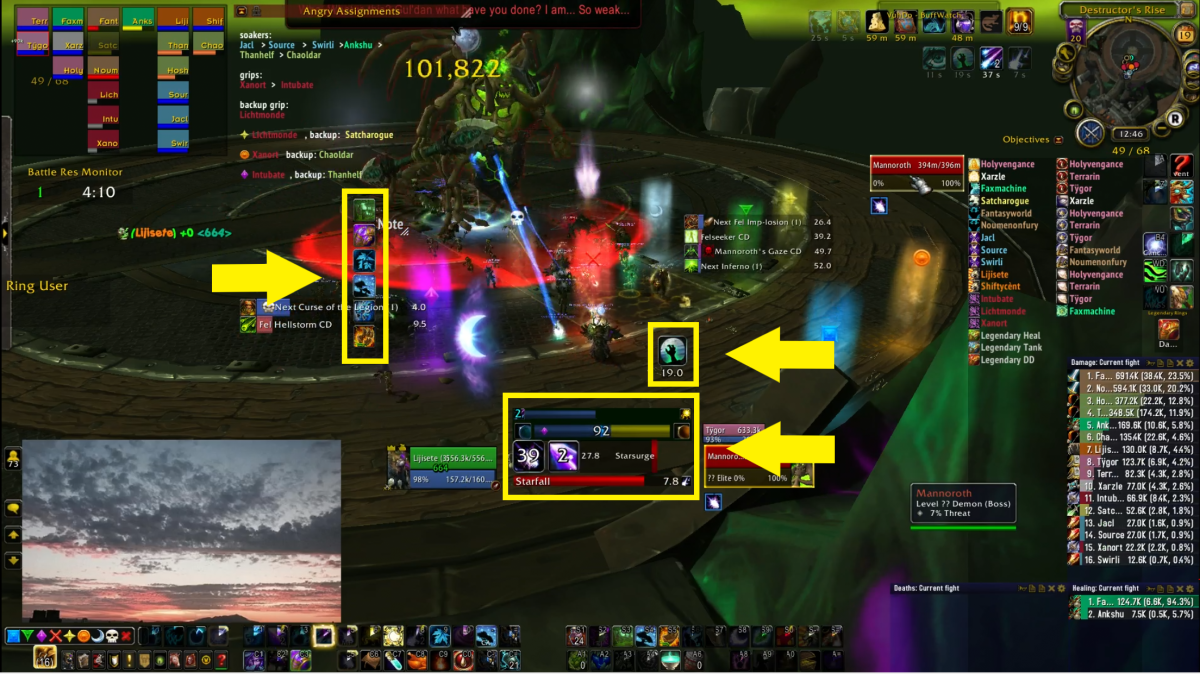
The circle shows the boss itself, it is a skeletal dinosaur with green fire glowing through its bones. Its name is Mannoroth. The number 101,822 hovering over the boss was the number of damage I did to the boss in that moment: numbers like that appear and disappear constantly, as I do damage. This is the boss itself, and will move around the room. The tanks have to make sure they keep the boss’s attention focused on them, and constantly use defensive moves. Melee have to keep running back to the boss if they ever had to move away. Ranged have to make sure they’re constantly turned towards the boss, otherwise their spells won’t cast.
The two boxes indicated by the down arrow and up arrow are both the boss unit frames. They indicate how much health the boss has (both show it at 100% health at this moment), and also show how much energy the boss has (both show the energy at 0% at the moment). The down arrow indicates the ‘target frame’: in WoW, your abilities don’t work unless you target something, by clicking on it. If you accidentally target the wrong thing, your abilities will affect the wrong thing. So if I target an ally, or not target anything, I can press buttons all I want but I will be doing no damage to the boss (this is something I did quite a lot my first year or two of gaming). The current target is the boss, so it shows the boss health and energy, but there are plenty of times when I need to switch targets, in which case this frame will show something else.
The up arrow indicates the ‘boss frame’, and this will always show the boss health and energy, no matter what I’m targeting. This is helpful because after I’m done killing something else I’ve targeted, I don’t really want to waste time turning my screen camera around to make sure I can click on the actual boss to target it again. The boss frame allows me to do that no matter where my camera is, and keeping my cursor near the boss frame makes it easy (yes, it may only take a second to move my cursor around the screen to click on the actual boss, but a second can be too much when you’re doing mythic raiding). As you can see in this photo, my cursor is hovering right over the boss frame. Furthermore, this allows me to have an idea of what’s going on with the boss health and energy, since the phases of the fight change based on the boss’s health, and he casts certain abilities based on how much energy he has.
Next is the buffs and debuffs.
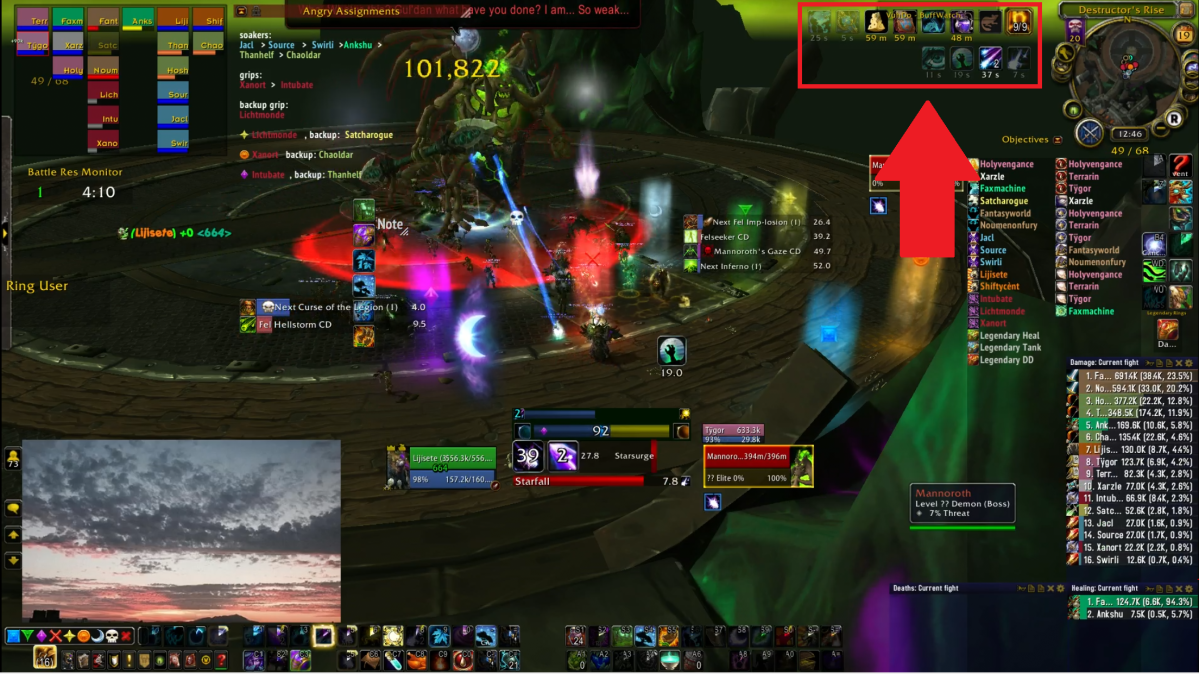
In WoW, there are abilities that change the state you are in. These state-changing abilities are called buffs or debuffs. Buffs make you stronger. Some buffs only last for a few seconds, and much of WoW raiding comes down to how well you can make use of the times when you have those buffs. Many dps try to make use of the time they have strong buffs to use their hardest hitting spells, or their cooldowns. Some buffs can last for a long time, usually an hour or so, and these generally come from consumables – food, flasks, runes – that you need to spend gold to buy, or spend time to make. There are some buffs that have no duration under them, and these buffs usually express what state you are in. I played a druid, which has many forms: I can shapeshift into a stag, a cat, a bear, or a moonkin (a big… chicken?), and each of these forms gives me special powers. While I’m raiding I am in moonkin form, and that is one of the buffs that has no duration.

Debuffs, on the other hand, create problems for you. They can make you do less damage, or take more damage, or move slower, or can cause other issues to happen to you down the road when they expire. Debuffs are extremely important in WoW raiding. Sometimes a debuff may cause you to explode and do damage to those around you, and another debuff may require you to stand near others in order to take less damage. Being aware of these debuffs is the responsibility of every single raider, and is a big part in what makes or breaks a successful raid. Much of a raid leader’s job is also to communicate to the raiders how they are expected to deal with each individual debuff within the strategy the raid has chosen. Oftentimes unsuccessful raid nights are the result of people knowing what they are supposed to do, yet not being aware enough of their debuffs to react quickly enough and execute the necessary actions. I have moved my debuffs to a location that stands out to me, so I am immediately aware whenever I have any debuff.
The upper left corner is the map.
The map is rarely used during boss fights, and I do not make use of it here. Some people use it to orient themselves, if they want to move North, South, East, or West. There are a few times when it can be handy in boss fights for mechanics as well. There was a boss fight where everything went black in one of the phases, but some classes with special abilities could see through the black to find where the boss was, and they could indicate on the map for everyone else to see.
Under the buffs and the map are the raid cooldowns.
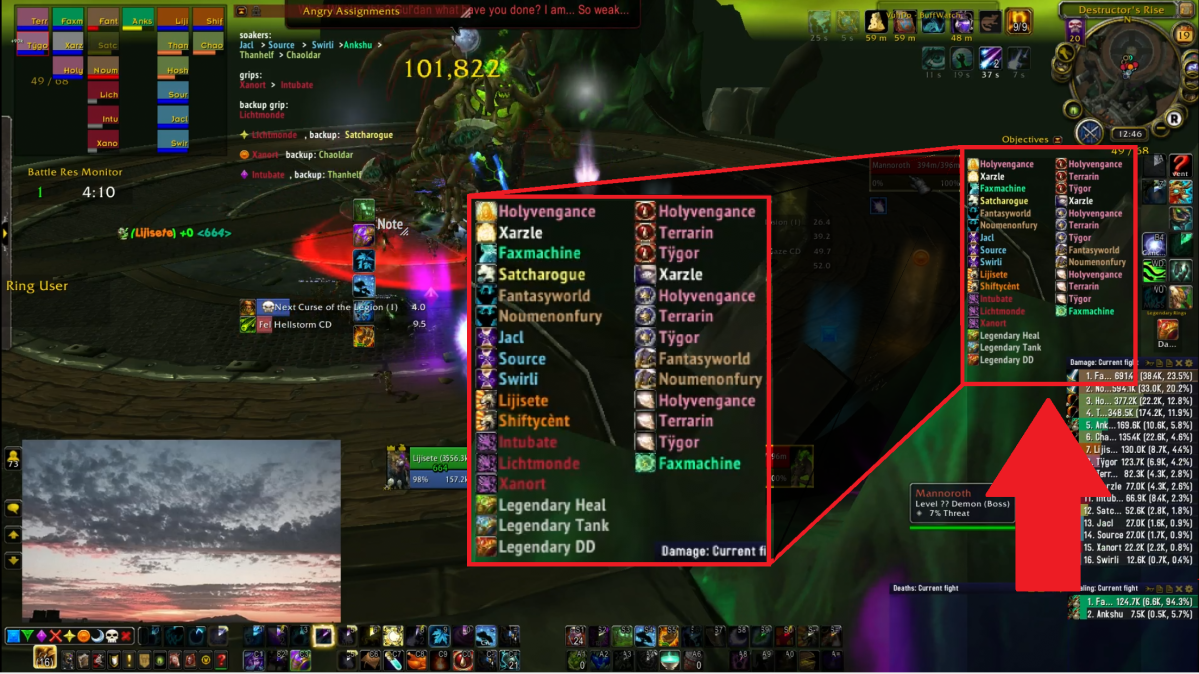
Various classes may have special abilities that can affect the whole raid, or affect others in specific ways. These abilities usually can only be used once every 3 minutes or so. The way I have it set up, the icons show the ability, and the name shows whose ability it is. I’m not that great at recognizing the icons, but since each class only has specific raid-wide abilities, the colors and position usually enable me to know which one it is. Knowing which of these abilities are available to me, or how soon they will be available is a big part of being aware of the situation as a raid leader.
The left side column starts with healing cooldowns from healers (Holyvengance, Xarzle, Faxmachine), which usually last about 8 seconds and do an intense amount of healing to everyone in that time. Then there is a rogue one, an ability which allows everyone who stands in a specific area to take 10% less damage for 5 seconds. Next is two warrior ones, which grant the entire raid 15% maximum health for 10 seconds. Next is three mage ones, which grant the entire raid 30% increased haste (you cast spells faster that way) for 40 seconds. Then there are two druid ones, which increase everyone’s movement speed by 60% for 8 seconds: this was important for the fourth phase of the fight, when we were pushed all the way across the platform, this spell, stampeding roar, allowed us to move against that push-back more easily (at 6:18 in the video I say there are ‘no roars’, and at 7:02 I tell Shifty to use his roar). The next three are the death knight ‘grips’ mentioned above. Lastly there were legendary ring abilities, a type of special gear that only existed during the time of this raid.
The right side column is composed of abilities that affect just one person. These abilities can be put on any ally to allow them to take less damage, or increase their health. They are more often used to help tanks, or if certain mechanics require that a specific raid member take a lot of damage. In this particular fight I didn’t assign when any of these needed to be used, but there are fights when I do need to watch out for this. Often, we ask tanks to be aware of this as well, since if they run out of their own defensive abilities, it helps for them to ask for ones from other raiders.

Below the raid cooldowns are the meters.

I have three meters set up. The largest one, on top, is the damage meter. It shows how much damage each person has done during the fight, ranking from the most damage done down to the least damage done. The one immediately below that is the healing meter. It shows how much healing each person has done during the fight, ranking from the most healing down to the least healing done. The damage one is the longest, since raids have the most number of dps, and as a raid leader it is important to me to be aware of which players do the most damage as well as which players do the least. This is the same for healing, but most raids only have about 4 healers, so this window does not need to be as long.
The third, empty, window is my utility window: I use it to show various situations that happen during the raid. It can show interrupts, a spell that almost everyone has. Sometimes we need to interrupt spells cast by the boss or other enemies, or sometimes we need to avoid doing so: the interrupt meter can show me who did interrupts and who didn’t. At 4:50 in the video, I tell everyone ‘no interrupts’, because if anyone interrupted that, we wouldn’t be able to counter another ability that was happening at the same time, and that would have caused the deaths of at least 3 people. It can show damage done to specific enemies, since during the boss fight, other enemies can appear. Sometimes it is more important to kill other enemies that aren’t the boss, and if we’re not killing them in time, I can use this to find out who is doing more damage to them and who is doing less. By default, I set it to ‘deaths’, which will show me if anyone died, and what the killing blow to them was. This is helpful in finding out if anyone messed up, since the killing blow often shows which mechanic killed them. After we wipe, I usually go directly to this window and toggle between the various bits of information it can show, to help me figure out what went wrong and decide what adjustments are needed.
In the corner near my meters, I also have my tooltip, which gives me extra information about whatever my cursor is pointing at.
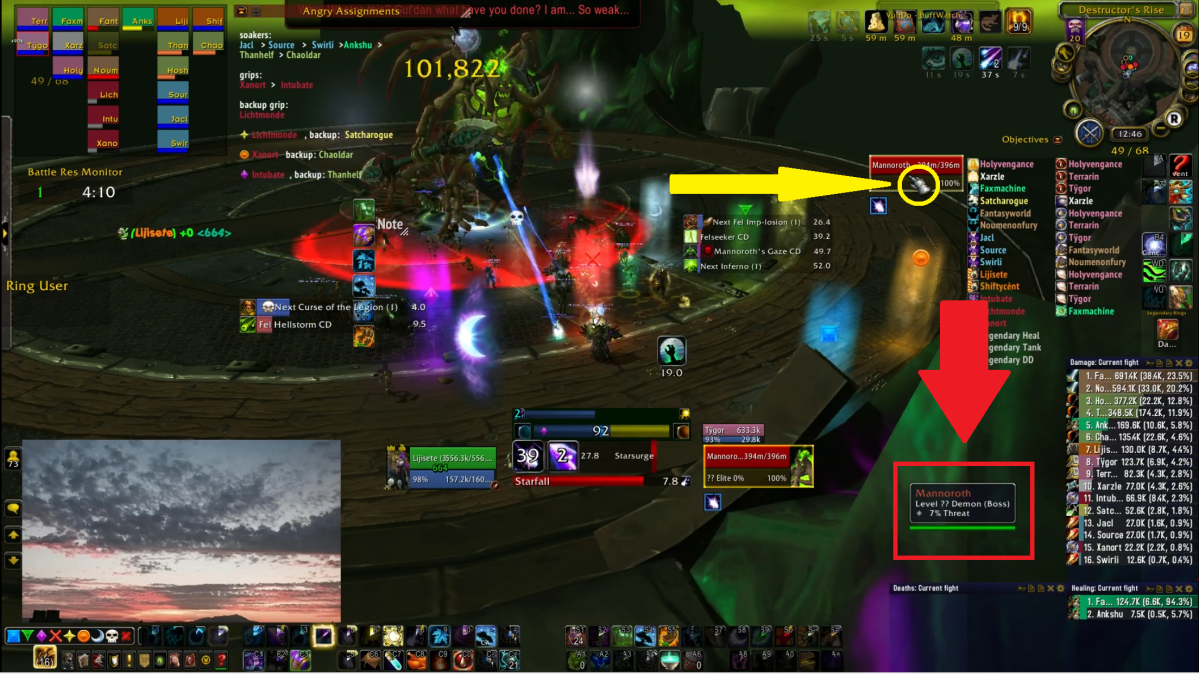
This appears whenever my mouse hovers over any player, enemy, spell, or item. At the moment, since my mouse is hovering over my boss frame (as shown by the yellow arrow), it shows me extra information about the boss: Mannoroth, Level ?? Demon (Boss), 7% Threat. Mannoroth is the name of the boss; its level is higher than the level of the players, so we’re not allowed to see what level it actually is, hence the “??”; it is a demon (there are items and spells that are especially useful against demons as opposed to, say, humanoids or dragonkin); and I have 7% threat, while the tank probably has 100% threat, so the boss will focus the tank instead of me.
The tooltip is extremely useful for a raid leader, since when I see someone mess up, I just need to move my cursor over them and glance at my tooltip to figure out which of the other 19 people that was.
At the bottom and the side of the screen, I have my action bars.
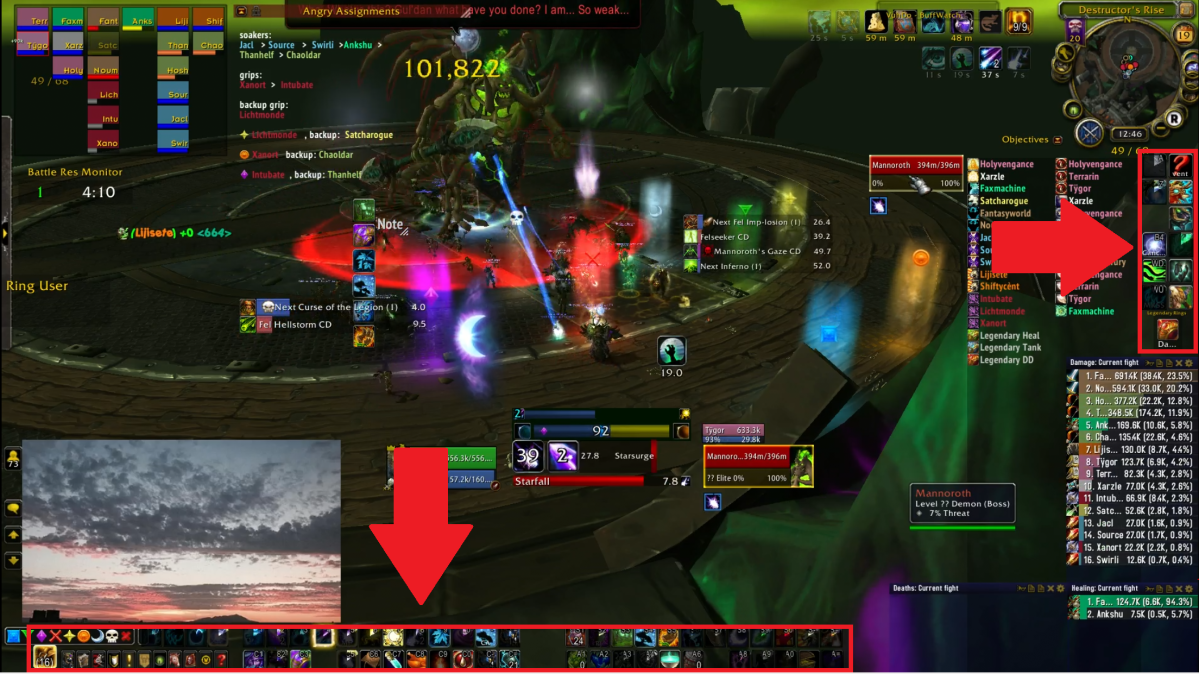
These are buttons that I can click on to cast spells or use items. For the most part, I don’t actually click on them, since that would take too long, and I’m not that precise with my cursor. Also, I need my cursor for other things, like choosing different targets, or moving my camera around, or hovering over things to see what they are. As such, these abilities are all ‘bound’ to certain keys on my keyboard or mouse, so I only need to press a key to cast a spell, instead of moving my mouse over to my action bars. So, in truth, most of the things on these bars aren’t really necessary, I could make them all invisible, and as long as I remember which spell is bound to which key, I’m ok. It can be useful to have for if I do end up moving spells to different keys, so I have tried to make my action bars small and out of the way, so they can be used yet won’t block up my screen.
In the bottom left corner, I have my chat window.
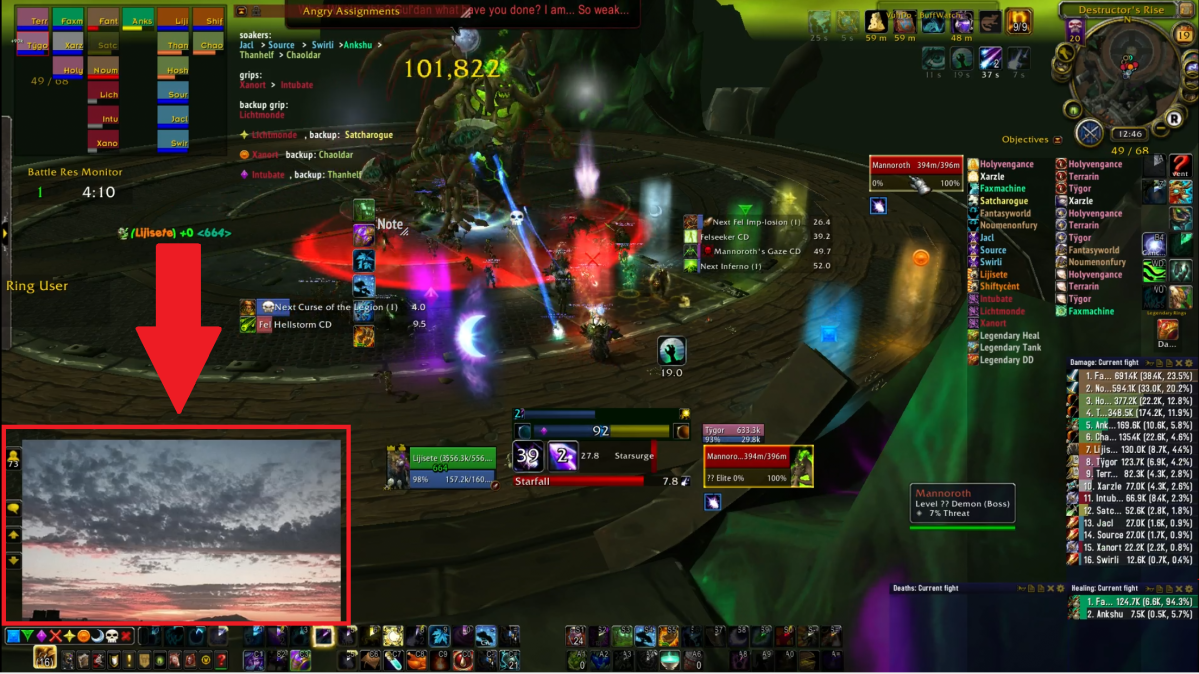
To preserve the privacy of others’ discourse with me, I have a picture of the view outside my window over the chatbox for all recordings and streams. In my videos, if there is ever any time where I don’t seem to be doing anything, it’s likely that I’m typing or reading my chats.
Near the center bottom of my screen is my player frame.
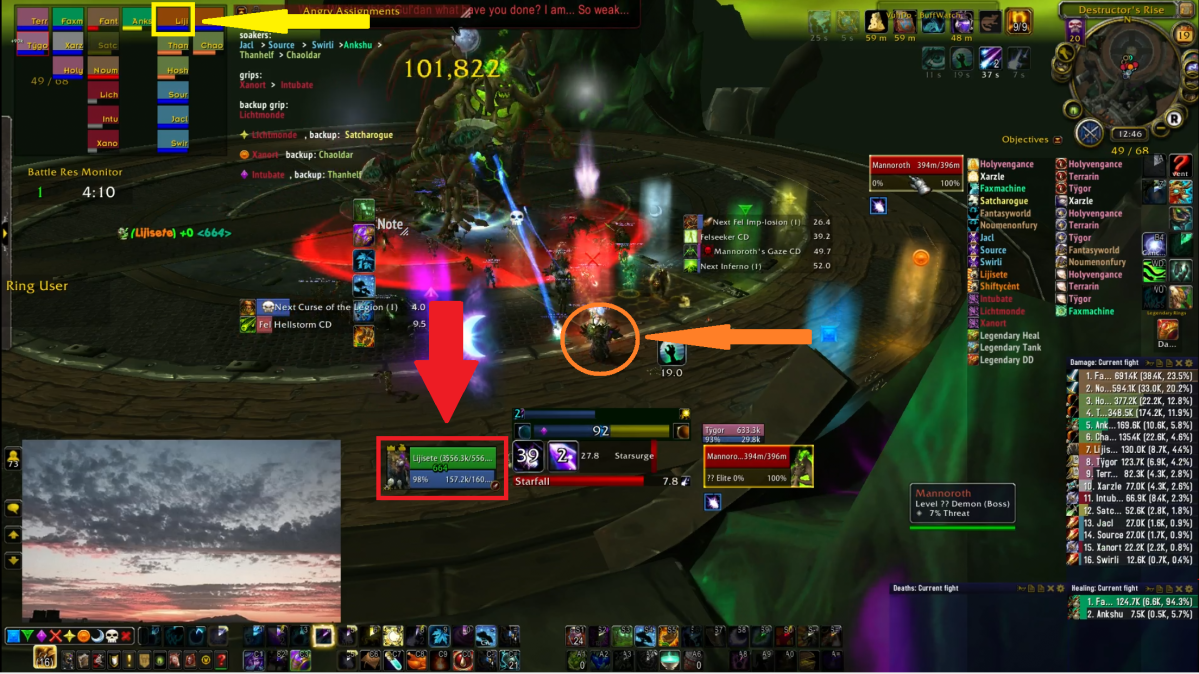
It is indicated by the red arrow and is in the red box. This, like the previous boss frames and raid frames, show my health and the amount of resource I have (here, it’s mana). I could alternately look at the raid frames to find the same information, as indicated by the yellow arrow and box, but having my player frame somewhere more centered and larger makes it easier for me to be aware of what’s going on with my health. Ultimately, being extra aware of my own health and not allowing myself to die is one of the most important abilities of any raider. There are even ways built into the game to make your whole screen flash red if you drop to very low health, because it’s so important to be aware of this.
The orange arrow and circle indicates where my character is actually standing. It will always be in the middle of the screen, and since I zoom so far out on my screen, my character (and others) tend to look very small. In the end, it’s not so important to be able to see my character, since I know it is always in the middle of the screen. So as long as the middle of my screen is a safe spot to stand in, I’m good.
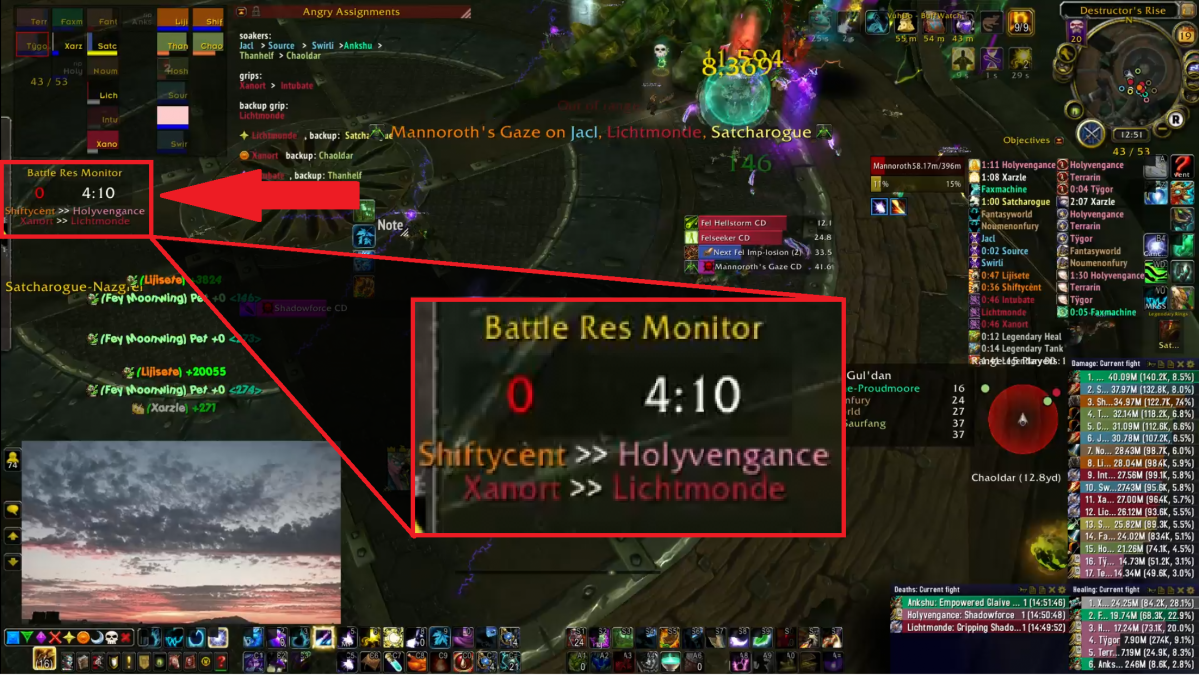
Under my raid frames on the left, I have a battle resurrection monitor.

While raiding, there are certain classes that have the ability to resurrect an ally from the dead. This doesn’t mean that you can just keep resurrecting people whenever they die and eventually kill the boss though. You are allowed one battle resurrection about every 5 minutes or so, so if the fight lasts 5 minutes, you would only be able to get one. This monitor also shows me if a battle resurrection was done, who did it, and who it was done on.
There are numbers that appear on my screen called battle text.
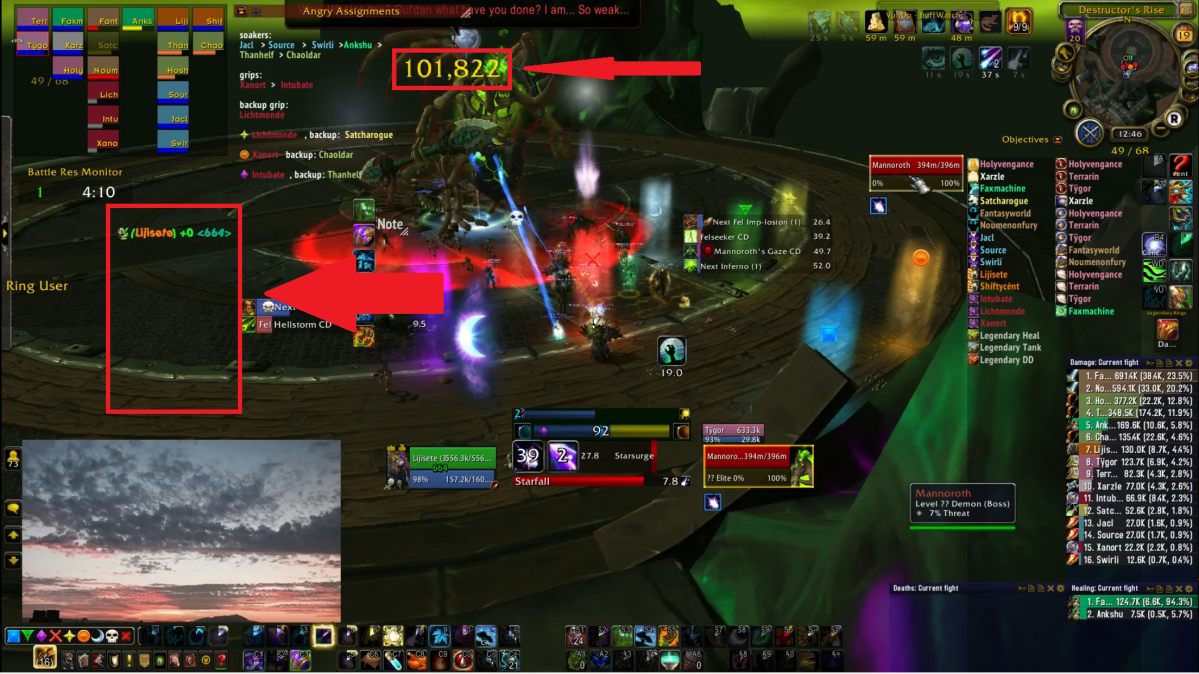
The green ones always appeared on the left, and they showed me how much healing I was receiving. The yellow ones appeared above whichever enemies I was damaging, and those show how much damage I was doing to them. In the time since we did this, I would move those battle texts to other areas of my screen.
Near the middle of the screen, I have my timers.

These are extremely important to any raider. They give you a countdown to when the mechanics of the fight happen. On the left side, I have the abilities that will be happening within the next 10 seconds. So at this moment, the next ‘Curse of the Legion (1)’ will be happening. The (1) indicates it’s the first ‘Curse of the Legion’ in the fight. In 9.5 seconds, the ‘Fel Hellstorm CD’ will be up, which means the boss will be able to cast it at any time afterwards. On the right side are the mechanics that will take a bit longer to happen. As we can see, the next ‘Fel Imp-losion (1)’ is happening in 26.4 seconds. This is the one that drops many small enemies all spread out, that need to be killed within a few seconds, so our death knights need to ‘grip’ them all to one spot so we can kill them quickly. In 39.2 seconds, the ‘Felseeker CD’ will be up, which means the boss can cast ‘Felseeker’ at any time afterwards, a huge circle that will grow and explode and kill anyone who doesn’t move out quickly enough. In 49.7 seconds, the ‘Mannoroth’s Gaze CD’ will be up, and the boss can cast ‘Mannoroth’s Gaze’, which is the ability mentioned before that ‘horrifies’ three people, and a few seconds later does enough damage to kill them, unless there are other people near them to ‘share’ this damage. And 52 seconds later, there will be the first ‘Inferno’.
For any raider, it is very important to be aware of these timers. Since they relate to mechanics that can force you to move, or swap targets, or need to save other raiders, being ready for them makes all the difference between a successful raid and a wipefest (a raid session where the whole raid dies, or wipes, again and again and again and again). This matters even more to a raid leader, who has to be aware of everything that’s going on at all times.

Once the timer is up, the boss may cast the actual mechanic. When the mechanic is cast, it shows up in the middle of my screen. The announcement on top is a shared announcement, that appears to everyone on the screen, regardless of whether or not ‘Mannoroth’s Gaze’ was cast on them. This enables everyone to be aware that it was cast, and that it was on Jacl and me. The announcement below is one that is made to me simply because I was chosen by the mechanic, and I would now be ‘horrified’, or unable to do anything, until the cast was over (2.0 seconds from the moment in this picture).
Near the bottom of my screen are my cast bars.
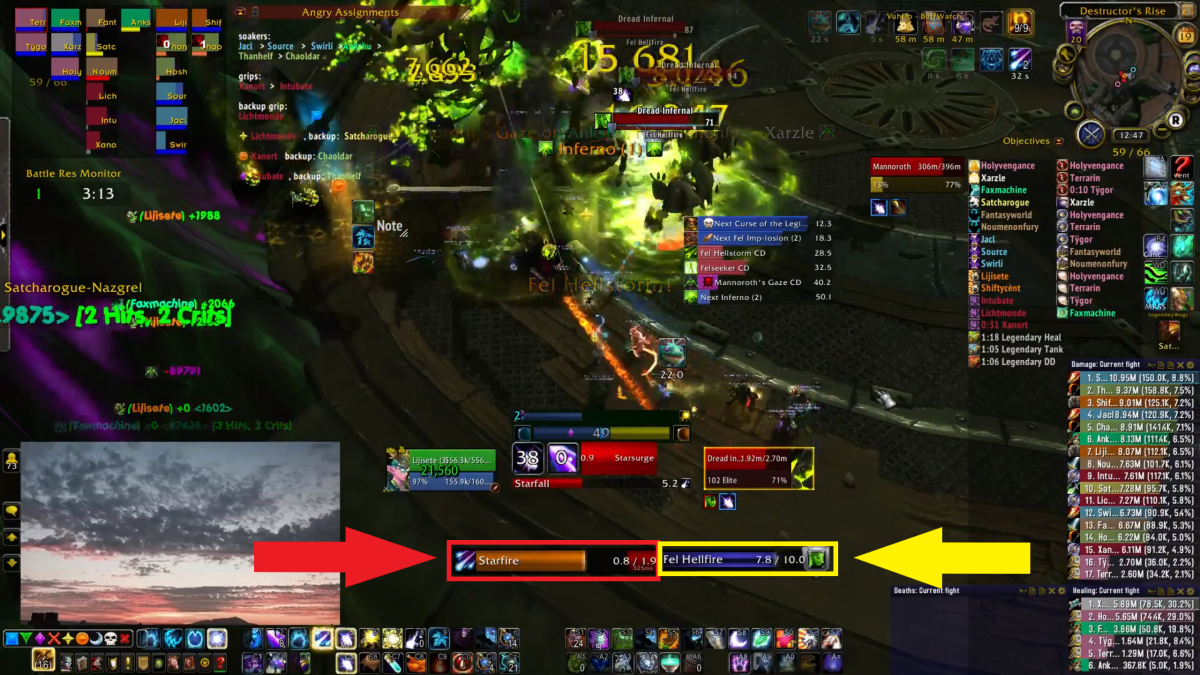
The red box is the spell that I am currently casting. In this case, it is called Starfire, it takes 1.9 seconds to cast, and I’ve already casted 0.8 seconds of it. As with most range spells, if I were to move during the cast, it would cancel the cast and I would need to start over if I wanted to cast it successfully. The yellow box shows what my target is casting. I currently have a ‘Dread Infernal’ targeted, and it is channeling a spell called ‘Fel Hellfire’. A channeled spell is something that continuously happens for the duration of the channel, unless it is interrupted or the caster moves. ‘Fel Hellfire’ is a 10 second channel, and there are 7.8 seconds left.
Lastly, I have ‘auras‘ set up.
There are addons in WoW that enable people to create various animations depending on what is going on. These animations are called auras, and they can show almost everything that is going on in the game. Since there is a lot going on at any one time, ranging from whether your spells are on cooldown or not, to what the boss is doing, to how much health you have, to how much resource you have, to whether or not you’re standing close to others, to whether or not you have successfully affected enemies with your spells and how long they will be in effect for, and many more things. Auras enable you to grab certain things that you think need to really be emphasized, and display them or create sounds or animations that alert you of what is going on. This is a big part in helping parse the large amount of information going on at any moment during a raid fight. Most people at least use it to help them know what spells they should be using at what time. Of the auras that are currently showing in this screenshot, the left auras show abilities that I have available (that are not on cooldown). The top right aura shows specific buffs that enhance my damage. And the bottom right aura gives me information related to my own playstyle (how many charges of a specific spell I have left, whether or not certain of my spells are affecting my target, and for how long, and what is going on with my resource, which at the time alternated between ‘solar’ and ‘lunar’ phases).
Each person’s user interface is different. Certain elements remain the same though. The game by default shows everyone their player and boss frames, raid frames, tooltips, action bars, chat window, and buffs and debuffs. Almost all good raiders add at least timers and auras. And almost all players add meters, to see how well they perform compared to others. Where each person puts each of these elements (or more) is unique. Many WoW players take a lot of pride in how they set their own UI up, and there are various schools of thought as to how much or little information is necessary to have a good UI. A good UI is often something that makes or breaks a raider in WoW, since it is paramount to a good raid to be able to parse the huge amount of information at any given second, prioritizing what is necessary to pay attention to, and reacting according to highest priority issues.
That there is so much going on at any one second in WoW is shown in how complicated a UI can be. If you watch any other raiders, you should be able to pick out similar elements on their UI, though they may be located in different spots and may have a different look. Later when I explain my thought processes, I will also be mentioning aspects of my UI that fed me information. My raid leading is closely tied to my interpretation and understanding of various bits and pieces of information, and my UI plays a large role in this. Of course, a UI only feeds the information, what a player does with the information is then what makes the player strong or weak. What I do with the information is what I will cover in the next part of this series.

One thought on “Raid Leading Explained (I)”